Installation
This page takes a fresh project to "plugin enabled and configured". It takes about ten minutes.
Requirements
| Requirement | Details |
|---|---|
| Engine | Unreal Engine 5.8 |
| Project | Blueprint or C++ project. The plugin ships as source and compiles with your engine. |
| Engine plugins (enabled automatically) | Mass Gameplay (Experimental), Niagara, Enhanced Input (used by the demo only) |
Step 1 — Install the plugin
From Fab: open the Epic Games Launcher → Fab Library → Mass Projectile Subsystem → Install to Engine. The plugin appears under Engine/Plugins/Marketplace.
Manually (project plugin): copy the MassProjectileSubsystem folder into <YourProject>/Plugins/. Create the Plugins folder if it does not exist.
Step 2 — Enable it
- Open your project and go to Edit → Plugins.
- Search for Mass Projectile, tick Mass Projectile Subsystem, and accept the dependency prompt.
- Accept the notice about Mass Gameplay being experimental.
- Click Restart Now.
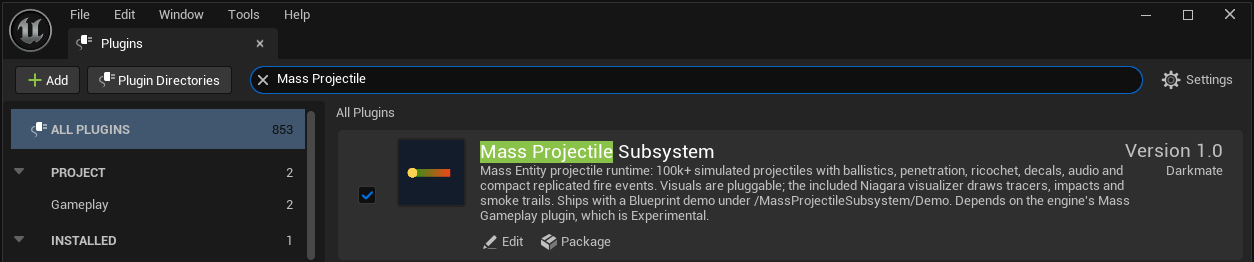
Blueprint-only project, plugin installed in the project folder: the editor asks to compile the plugin modules on first launch. Click Yes. This needs a C++ toolchain (Visual Studio 2022 with the Game development with C++ workload on Windows). Engine installs from Fab come precompiled.
Step 3 — Create the Projectile collision channel
Every projectile type traces against a collision channel. The shipped types use the project's first custom channel (ECC_GameTraceChannel1), expected to be an object channel named Projectile that other objects Block by default.
- Open Edit → Project Settings → Engine → Collision.
- Under Object Channels, click New Object Channel…
- Name it
Projectile, set Default Response to Block, click Accept.
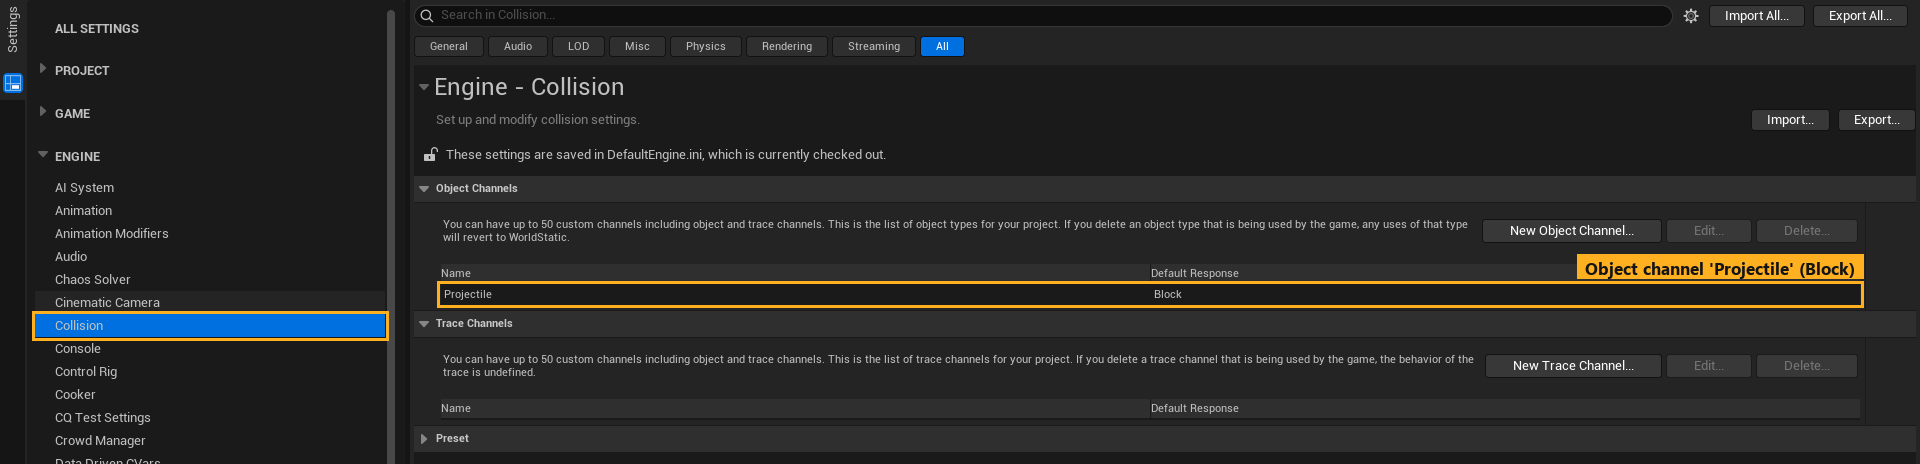
This writes the following into Config/DefaultEngine.ini:
[/Script/Engine.CollisionProfile]
+DefaultChannelResponses=(Channel=ECC_GameTraceChannel1,Name="Projectile",DefaultResponse=ECR_Block,bTraceType=False,bStaticObject=False)
Already using custom channels? If
ECC_GameTraceChannel1already means something else in your project, create the Projectile channel anyway (it gets the next free slot). Then open each projectile type and set Projectile Ballistics → Trace Channel to Projectile. See Projectile Types.
To make something bullet-proof (a trigger volume, a pickup, a character's capsule while the mesh takes hits), set its collision response to Projectile = Ignore.
Step 4 — Name the physical surfaces (recommended)
The shipped surface table and physical materials (/MassProjectileSubsystem/Surfaces/PM_*) use surface slots 1–6. Naming them makes every dropdown readable.
- Open Project Settings → Engine → Physics and scroll to Physical Surface.
- Enter these names:
| Slot | Name | Physical material |
|---|---|---|
| SurfaceType1 | Concrete | PM_Concrete |
| SurfaceType2 | Metal | PM_Metal |
| SurfaceType3 | Wood | PM_Wood |
| SurfaceType4 | Dirt | PM_Dirt |
| SurfaceType5 | Glass | PM_Glass |
| SurfaceType6 | Water | PM_Water |
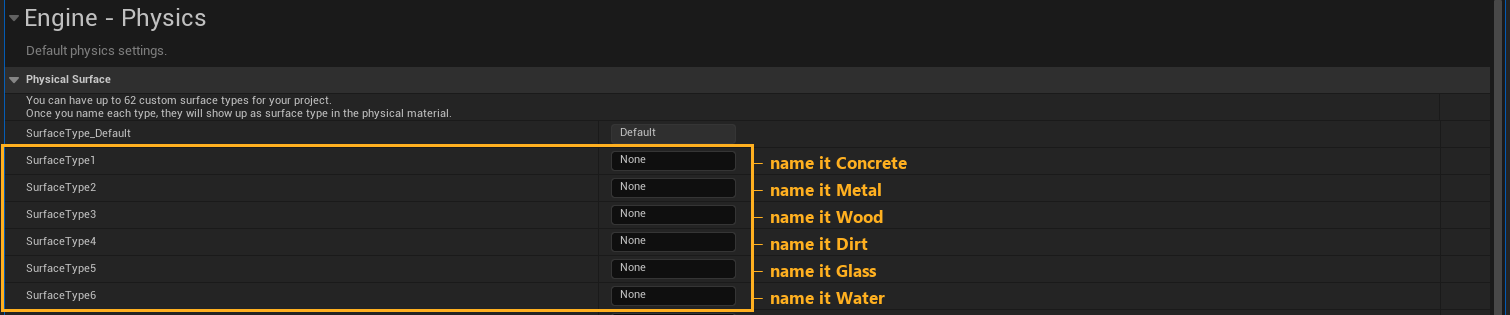
Unnamed slots still work. The names are display only. If your project already uses slots 1–6 for other materials (for example SurfaceType1 = Flesh), read Physical Surfaces → Using your own surfaces before continuing.
Step 5 — Check the plugin settings
Open Project Settings → Plugins. The plugin adds two pages:
| Page | Holds |
|---|---|
| Mass Projectile Subsystem | Simulation: performance budgets, world surfaces, decals, audio, networking |
| Mass Projectile Niagara | Visuals: the tracer, impact and smoke Niagara systems |
Every slot already points at the shipped content under /MassProjectileSubsystem/, so nothing has to be assigned to get started. Details: Project Settings.
Step 6 — Verify
Open /MassProjectileSubsystem/Demo/Maps/L_MassProjectileDemo and press Play. Hold the left mouse button: tracers fly, hit the range walls, leave decals, and ricochet or punch through depending on the wall material. Continue with the Quick Start.
Where the content lives
Enable Show Plugin Content in the Content Browser settings to see it.
/MassProjectileSubsystem/
├── Types/      EC_Projectile_Rifle, EC_Projectile_Shell, EC_Projectile_Plasma   ← projectile types
├── Surfaces/   PM_Concrete, PM_Metal, PM_Wood, PM_Dirt, PM_Glass, PM_Water      ← physical materials
├── FX/         NS_MassProjectile, NS_ProjectileImpactFX, NS_ProjectileSmokeTrail, debris meshes
├── Decals/     M_ImpactHoleDecal (impact/exit) and M_ProjectileBoreDecal (bore) + hole textures
├── Audio/      SW_Flyby_Rifle / Shell / Plasma, ATT_BulletFlyby
├── Materials/  MI_Breachable_* demo wall materials
└── Demo/       L_MassProjectileDemo, BP_DemoShooterPawn, BP_DemoGameMode, input assets
The plugin never references /Game content. You can delete the Demo folder once you no longer need it.